1、首先对于前期配置好的Debug_x64_opencv320.props引入新项目的步骤如下
属性管理器->Debug|x64->添加现有属性表->将原先配置好的Debug_x64_opencv320引入->完成
2、为了便于查看分为三个文件
对于函数的声明:
basicImageGraphics.h
对于声明函数的实现:
basicImageGraphics.cpp
main函数:
testMain.cpp
basicImageGraphics.h
#pragma once

#include<iostream>

#include<opencv2/core/core.hpp>

#include<opencv2/highgui/highgui.hpp>

#include<opencv2/imgproc/imgproc.hpp>

#define WINDOW_WIDTH 600

//声明一个画椭圆的函数和一个画圆的函数

class basicImageGrahics {

    public:

        void DrawEllipse(cv::Mat img,double angle);

        void DrawFilledCircle(cv::Mat img, cv::Point center);

};
basicImageGraphics.cpp
#include"basicImageGraphics.h"

#include<iostream>

#include<opencv2/core/core.hpp>

#include<opencv2/highgui/highgui.hpp>

#include<opencv2/imgproc/imgproc.hpp>

using namespace cv;

//对于头文件中的声明函数的实现

void basicImageGrahics::DrawEllipse(Mat img, double angle) {

    int thickness = 2;

    int lineType = 8;

    ellipse(img,

        Point( WINDOW_WIDTH/2, WINDOW_WIDTH/2),

        Size(WINDOW_WIDTH/4, WINDOW_WIDTH/16),

        angle,

        0,

        360,

        Scalar(255,129,0),

        thickness,

        lineType);

}

//point是OpenCV中最常见数据结构,支持整型、浮点型等数据类型,经常用来表示矩阵中某个点,是OpenCV中最简单的数据结构,按照维度主要分为二维(Point2)和三维(Point3)两个类型,可以再由该数据类型组成固定数量的vector。

//Size数据结构经常被OpenCV用来表示尺寸,其成员为width和height,被用来表示矩阵或者图片的宽和高。

/*

void circle(InputOutputArray img, Point center, int radius, const Scalar& color, int thickness = 1, int lineType = LINE_8, int shift = 0);

img:表示输入的图像

center : 圆心坐标

radius : 圆的半径

color:Scalar类型,表示圆的颜色,例如蓝色为Scalar(255, 0, 0)

thickness : 线的宽度

lineType:线的类型,(默认为8联通型)

*/

void basicImageGrahics::DrawFilledCircle(Mat img, Point center) {

    int thickness = -1;

    int lineType = 8;

    circle(img,

        center,

        WINDOW_WIDTH/32,

        Scalar(0, 0, 255),

        thickness,

        lineType

    );

}

/*

Circle(CvArr* img, CvPoint center, int radius, CvScalar color, int thickness=1, int lineType=8, int shift=0)

对于circle函数的相关解释:

img为源图像指针

center为画圆的圆心坐标

radius为圆的半径

color为设定圆的颜色,规则根据B(蓝)G(绿)R(红)

thickness 如果是正数,表示组成圆的线条的粗细程度。否则, - 1表示圆是否被填充

line_type 线条的类型。默认是8

shift 圆心坐标点和半径值的小数点位数

*/
testMain.cpp(main函数的实现)
#include"basicImageGraphics.h"

#include<iostream>

#include<opencv2/core/core.hpp>

#include<opencv2/highgui/highgui.hpp>

#include<opencv2/imgproc/imgproc.hpp>

#define WINDOWS_NAME1 "【原子绘制图】"

using namespace cv;

int main() {

    Mat atomImage = Mat::zeros(WINDOW_WIDTH, WINDOW_WIDTH,CV_8UC3);//zeros函数创建一个指定尺寸和类型的零矩阵

    basicImageGrahics BIG;

    //下面四个函数创建原子轨道

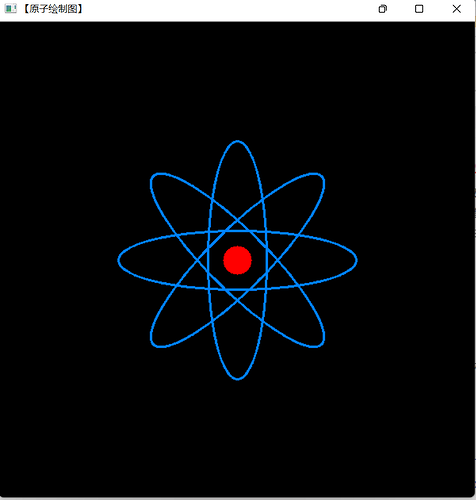
    BIG.DrawEllipse(atomImage,90);

    BIG.DrawEllipse(atomImage,0);

    BIG.DrawEllipse(atomImage,45);

    BIG.DrawEllipse(atomImage,-45);

    //下面创建原子中心原子核

    BIG.DrawFilledCircle(

        atomImage,

        Point(WINDOW_WIDTH/2, WINDOW_WIDTH/2)

    );

    //将生成的图片写入路径

    imwrite("【原子绘制图】.png", atomImage);

    //显示图片

    imshow(WINDOWS_NAME1,atomImage);

    waitKey(100);

    return 0;

}
效果:
路径中生成的文件:

