下面是pytorch框架下一些对图片预处理的常规函数
from PIL import Image
from torch.utils.tensorboard import SummaryWriter
from torchvision import transforms

writer=SummaryWriter('logs')
img_path='dataset/train/ants/0013035.jpg'
img=Image.open(img_path)#打开一张图片PIL格式
print(img)
1.ToTensor
以下是库里面对函数的部分描述
class ToTensor(object):
Convert a ``PIL Image`` or ``numpy.ndarray`` to tensor.
Converts a PIL Image or numpy.ndarray (H x W x C) in the range [0, 255] to a torch.FloatTensor of shape (C x H x W) in the range [0.0, 1.0]
    """
即把PIL或者ndarray格式的图片转换为张量形式,数值介于0-1
注意:如果IMG为numpy.ndarray形式,输入格式必须为(HxWxC),否则需要按照库中的要求进行修改
实例:
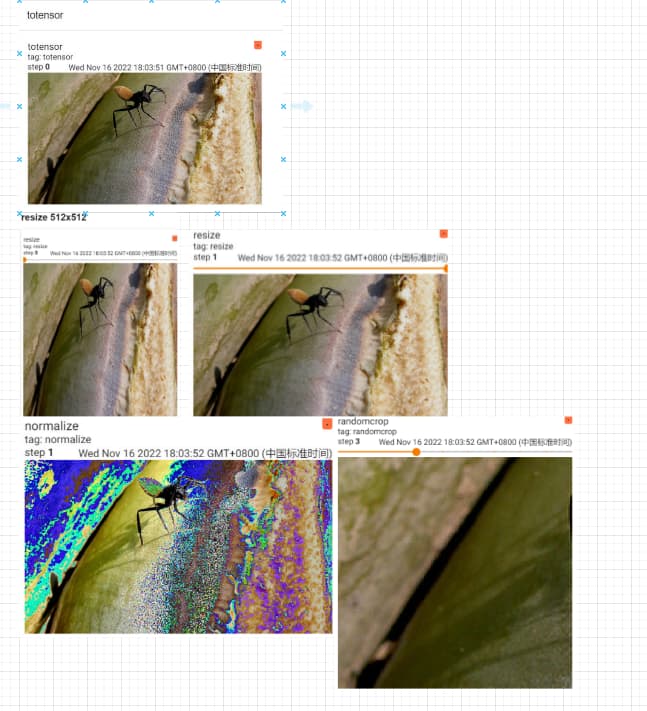
trans_totensor=transforms.ToTensor()#创建一个对象
img_tensor=trans_totensor(img)#将PIL格式图片转换为TENSOR
writer.add_image('totensor',img_tensor)#写入日志文件
print(img_tensor)
2.normalize
以下是库中对Normalize的解释
class Normalize(object):
    Normalize a tensor image with mean and standard deviation.
    Given mean: ``(M1,...,Mn)`` and std: ``(S1,..,Sn)`` for ``n`` channels, #给定均值和标准差
    this transform will normalize each channel of the input ``torch.*Tensor`` i.e.#输入为tensor形式
    input[channel] = (input[channel] - mean[channel]) / std[channel]``#归一化公式
即通过给定的均值和标准差差,来将数据标准化
注意:处理的图片要转换成tensor形式
实例:
print(img_tensor[0][0][0])#输出第一层第一行第一列的像素rgb数值: 0-255
#Given mean: ``(M1,...,Mn)`` and std: ``(S1,..,Sn)`` for ``n`` channels, this transform
trans_normal=transforms.Normalize([0.5,0.5,0.5],[0.5,0.5,0.5])
#创建对象,rgb图片有三个通道,第一个列表为给定的三个通道的均值,第二个为标准差
img_normal=trans_normal(img_tensor)
#img_tensor的数据已经转换到0-1,根据计算公式,图片rgb数值转换到[-1,1]
print(img_normal[0][0][0])#打印第一层第一个像素点的rgb值
writer.add_image('normalize',img_normal,1)
3.resize
class Resize(object):
   Resize the input PIL Image to the given size.
输入两个数(size1,size2)时,图片会按照给定数输出像素点,
只有一个参数(size)时,为最短边输出的像素点数量,不改变高和宽的比例,只改变最短边和长边的大小关系(改变像素值)?
print(img.size)
trans_resize=transforms.Resize((512,512))#创建转换成512*512的对象
#img_pil->resize->img_resize_pil
img_resize=trans_resize(img)#转换为512*512
#img_pil->img_tensor
img_resize=trans_totensor(img_resize)
print(img_resize)
writer.add_image('resize',img_resize,0)
4.compose
功能:将多个步骤整合到一起
trans_resize_2=transforms.Resize(512)
trans_compose=transforms.Compose([trans_resize_2,trans_totensor])#compose需要参数为列表形式
img_resize_2=trans_compose(img)#将图片resize(512),转换成tensor形式
writer.add_image("resize",img_resize_2,1)
5.random_crop
库说明
size (sequence or int): Desired output size of the crop. If size is an
            int instead of sequence like (h, w), a square crop (size, size) is
            made.
trans_random=transforms.RandomCrop(512) #裁剪成512x512
trans_compose_2=transforms.Compose([trans_random,trans_totensor])#操作打包
for i in range(10):#裁剪10张
    img_crop=trans_compose_2(img)
    writer.add_image("randomcrop",img_crop,i)


writer.close()